Keywords
FLIM, bio-imaging, microscopy, visualization, fluorescence, Python
This article is included in the Python collection.
FLIM, bio-imaging, microscopy, visualization, fluorescence, Python
Fluorescence lifetime imaging microscopy (FLIM) is an imaging technique where the image contrast is derived from the differences in the exponential decay rate of the fluorescence from a fluorescent sample (Bower et al., 2018).
In modern two-photon FLIM, the most widely used detection method is known as time-correlated single-photon counting (TCSPC) (Becker et al., 2004). TCPC employs a pulsed excitation source, such as a laser or a light emitting diode and measures the timing of arrival of single photons originating from the fluorescent sample on a detector to reconstruct the fluorescence lifetime decay (McGinty et al., 2016). Typically, different fluorophores can be characterized by their fluorescence lifetimes. Furthermore, fluorescence lifetimes of a fluorophore can be affected by its environment, therefore FLIM have emerged as a valuable tool, providing unique contrast mechanisms for biomedical imaging (Bower et al., 2019; Hirvonen & Suhling, 2016; Ranawat et al., 2019).
To reconstruct TCSPC based FLIM image, several non-trivial data processing steps are necessary. For extracting the lifetime and amplitude data from initially saved raw files, first the data has to be imported from proprietary files such as Becker and Hickl .sdt, or PicoQuant .ptu. Next, signal preprocessing through denoising or binning has to be applied to ensure robust performance in low photon count scenarios. Finally, after compensating for instrument response function, biexponential decay curves are fitted to extract lifetime and amplitude values for two dominant components at each pixel.
Several commercial and open source packages are already available for FLIM analysis (Bergmann, 2003; Fli; Warren et al., 2013). However, in practice, when custom FLIM analysis capabilities are required, this can lead to a need for building complicated signal processing and analysis pipelines (Borhani et al., 2019; Bower et al., 2017; Cao et al., 2020), involving a mix of commercial tools, open-source software and bespoke analysis algorithms. While other packages have been published, (Ballesteros et al., 2019), we expect that flimview, with its focus on simplicity, and versatility, will serve as a useful tool for the FLIM community which can also contribute to its growth.
Here we present a Python package, flimview, which provides a user-friendly toolkit for opening, fitting and visualizing FLIM data. The package can be used as a stand-alone tool for analyzing and visualizing FLIM data, or it can be used as a basis for creating end-to-end streamlined analytical pipelines in Python.
flimview is a library module implemented in Python 3 and can be installed using PyPI (e.g., pip install flimview). Installation instructions using Conda are also included within the repository. A complete list of requirements can be found at the package Github page but include standard Python libraries such as pandas, scipy, matplotlib, h5py, etc. The code is released under the open-source NCSA license which is based on the MIT open source license, allowing full and free use for both commercial and non-commercial purposes. Full usage documentation, Jupyter notebooks (web-browser interface that allows live Python codes), test data and others, including guidelines for contributions and issue reporting, are included in the project repository. This package has been tried in Windows, Mac OS and Linux Operating Systems. In general flimview works better in the latter two for which it is also expected to get supported development.
flimview consists of several utility libraries for storage, visualization and manipulation of FLIM data. After reading and processing the raw data (.ptu or .sdt files), the input data is stored in the main class of the package, a FlimCube, which is an object that represents 3D data (2D spatial dimensions and one temporal dimension) allowing multiple methods to access and manipulate the data cube.
Among its attributes is the header which includes all the metadata available for the dataset, sizes of the arrays, resolution and whether this cube is binned and/or masked (see Binning and Masking sections below). When the data cube is masked, a process described in the following sections, the pixel-level mask is also included as an attribute in the FlimCube object. Due to its construction, we consider a FlimCube to be self-explanatory as it contains all needed information (including its corresponding metadata) to analyze, visualize and fit the data.
Binning. flimview includes a binning function with several pre-defined kernels, although a user-defined kernel is also possible and can be easily added. The binning procedure is simply a convolution kernel applied to the image to increase the signal or to enhance its features. This function takes a FlimCube as an input and returns a FlimCube as output by copying all of the metadata and properties from the input data. The following snippet shows an example on how to bin an existing FlimCube using a Gaussian kernel of size 9×9 and a sigma of 3 (the size of the kernel is 2 ∗ b + 1, where b is the bin size)
import flimview.flim as flim
import flimview.io_utils as io # IO utils

data, header = io.read_sdt_file (sdtfile)
FC = flim.FlimCube (data, header) # FlimCube Class
FCbinned = flim.binCube (FC, bin=4, kernel=’gauss’, sigma=3)
# FCbinned is also a FlimCube object
#
The kernel functions included in flimview are Gaussian kernel, Airy disk kernel, linear kernel, and a flat kernel. Customized kernels can be easily incorporated. Figure 1 shows examples of different 9×9 kernels where we can observe how the weight is distributed around the central pixel. In the case of a Gaussian kernel or an Airy disk kernel, the width of the kernel can be customized using the sigma σ parameter. For reference, the Gaussian kernel is given by:
where x is the distance to the center pixel and I0 is a normalization factor (usually just a unit). In the case of the Airy disk, the kernel is given by: where J1(x) is the Bessel function of the first kind of order one. In both cases, I(x) is discretized and normalized to the unit across the 2d binning window.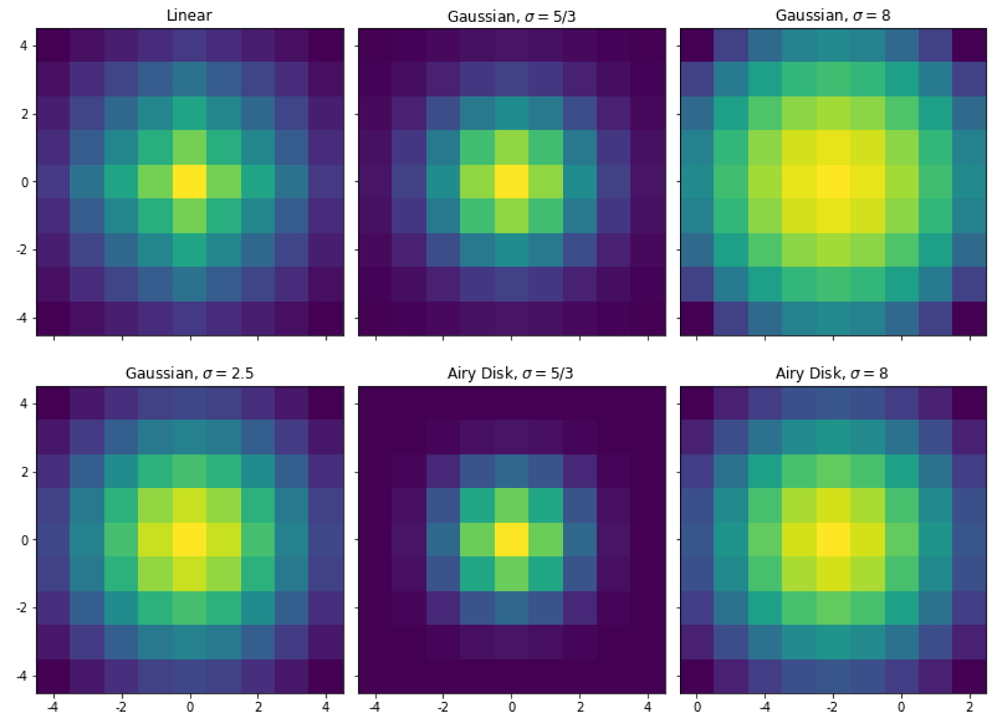
Masking. FlimCube also includes methods for looking at the header information and for masking pixels below a given integrated intensity, or below a given peak threshold in the time series, or even for a custom made geometry mask. The pixels masked this way will not be used during the fitting analysis while the mask is also saved within the same input FlimCube object. The following snippet shows how to apply a mask for a given FlimCube :
import flimview.flim as flim
import flimview.io_utils as io #IO utils

# Read data
# sdtfile = ...
data, header = io.read_sdt_file (sdtfile)
FC = flim.FlimCube (data, header)
# To mask by intensity
FC.mask_intensity(100)
# To mask by peak
FC.mask_peak(5)
# To mask by a given geometry
FC.mask_peak(0, mask=custom_numpy_masked_array)
#
Figure 2 shows different masks applied to the example raw (top) and binned (bottom) data. Masks can be combined and can be transferred between binned and raw data.
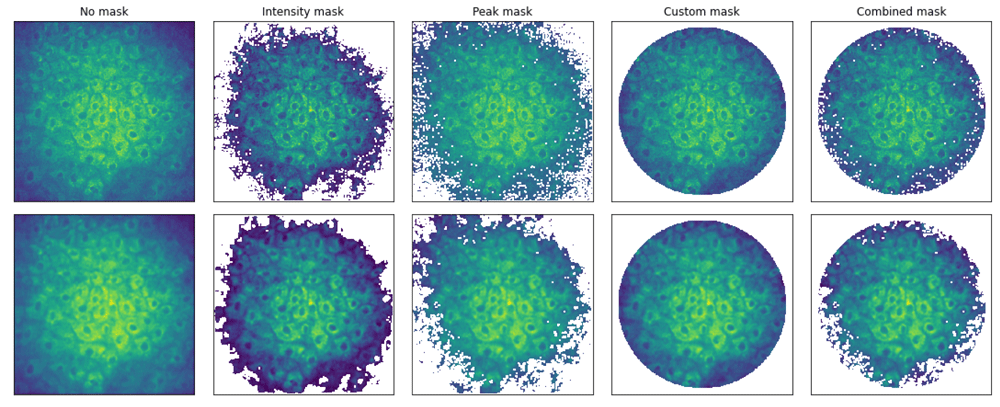
Masks can be combined. Masked pixels will not be used in the analysis.
Fitting. Once the data is read and binned, and have the low signal and error pixels masked, flimview provides a function to fit a decay function for every pixel in the temporal data using a predefined model (from the module models.py which can be customized and also parallelized. By default a double exponential is used as follows:
where a1 and a2 are the amplitudes for the given exponential factor. Usually, there is an extra constraint given by a1 + a2 = 1. τ1 and τ2 are the mean lifetime for each exponential. l0 is a level constant.Before fitting the entire cube, a single fit is done to the mean intensity values to obtain initial guess parameters for the fitting procedures as shown in Figure 3, as well as the boundaries to each parameter which can also be provided by hand. The snippet below shows how this is done using flimview :
import flimview.flim as flim
# Assuming a FlimCube FC, let’s compute the average of the pixel values
timesteps, mean_pixel = flim.meanDecay (FCbin)
# Let’s clean these by a threshold, normalize and shift to the maximum
timesteps_clean, mean_pixel_clean, max_value, time_shift = flim.cleanCurve (timesteps,
    mean_pixel, norm=True, threshold=0.02)
# Let’s assume a model (double exponential with a level parameter)
mymodel = models.model1
# Let’s fit that mean pixel using fitPixel function
# xf, yf are the time and value used for the fitting, pfit is the fitted values, pcov
     is the parameters covariance matrix and chi2
# is the Chi - square value of the fit
xf, yf, pfit, pcov, chi2 = flim.fitPixel(
     timesteps,
     mean_pixel,
     mymodel,
     initial_p =[0.8, 0.3, 3, 0.03],
     bounds =(0, np.inf),
     norm = True)
#
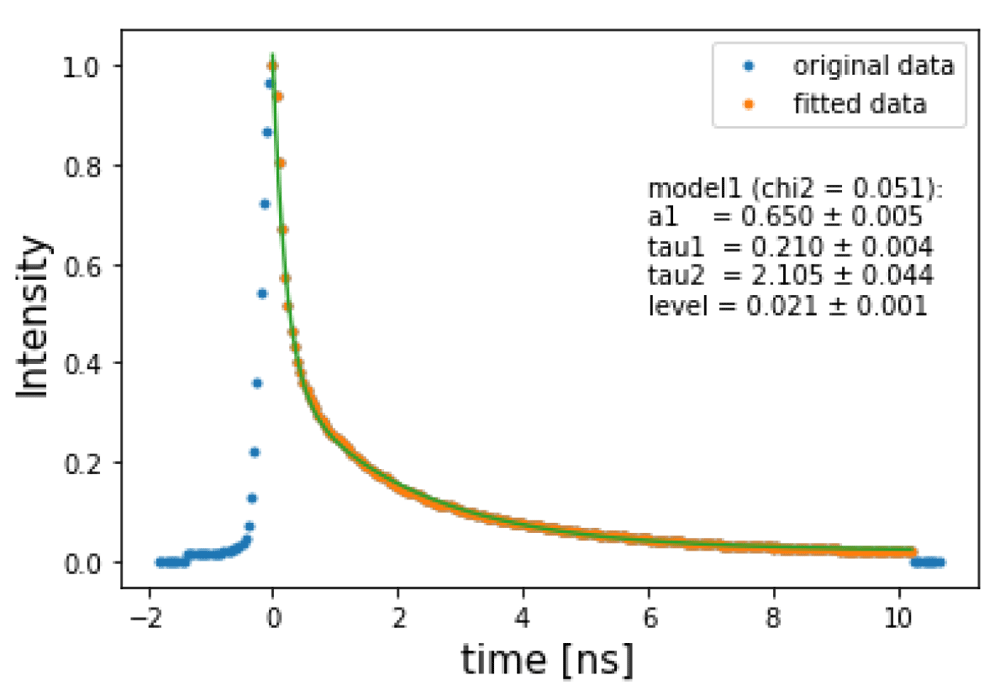
Note that the data is normalized, cleaned, and shifted with respect its peak. For example, to generate Figure 3 we can use the following:
# We can plot the fitted data (only considering from the maximum value)
plt.plot(timesteps - time_shift, mean_pixel/max_value, ’.’, label=’original data’)
plt.plot(xf, yf, ’.’, label=’fitted data’)
plt.plot(xf, mymodel(xf, *pfit))
plt.xlabel(’time [ns]’, fontsize=15)
plt.ylabel(’Intensity’, fontsize=15)
plt.text(6, 0.5, flim.printModel(mymodel, pfit, pcov, chi2, oneliner=False))
plt.legend(loc=0)
After those parameters are defined and a model is selected a function fitCube takes a FlimCube as input and produces another flimview class called FlimFit which contains the fitting information for every pixel, including all parameters from the model, their errors and χ2 values. It is a collection of 2D arrays for the results of the fitting.
To generate a FlimFit object we can use the following:
# Define the boundaries for parameters
bounds_lower=[0.0, 0.0, 0., 0.]
bounds_upper=[1, 1., 5., 1.]
# Fit the whole cube to create a FlimFit object
Ffit = flim.fitCube(
   FCbin,
   mymodel,
   pfit,
   bounds =(bounds_lower, bounds_upper),
   norm=True,
   threshold=0.02)
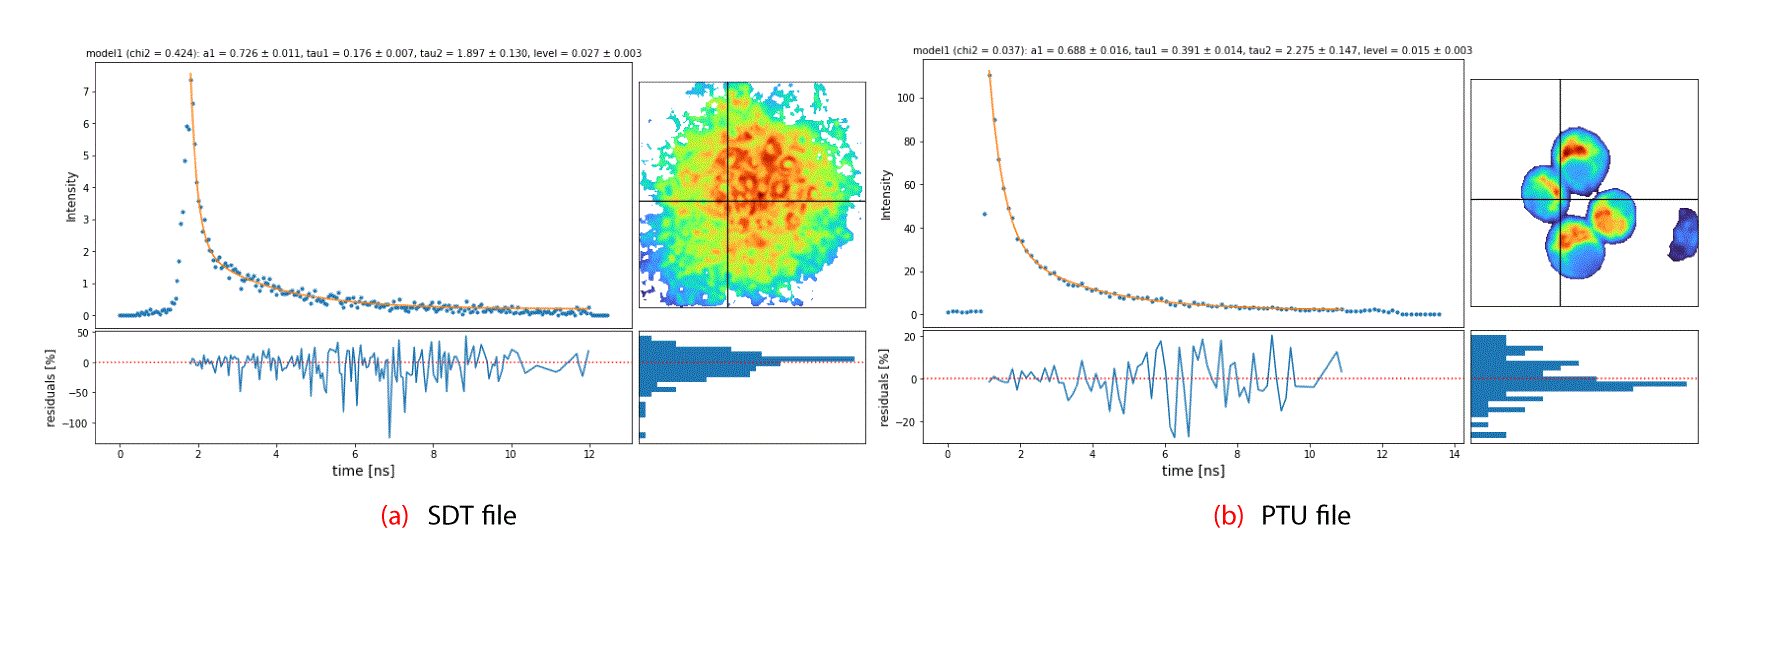
Visualization. The package also includes means to visualize the FlimCube and FlimFit objects using intensity or peak values. Additionally, one can visualize the results from the fitting procedure using a function called plotFit, which takes a FlimCube and a FlimFit as input, along with a pixel coordinate, to produce a figure as the one shown in Figure 4, showing the fit results for a given pixel, the parameters, the residuals, and the residuals distribution which is a useful way to explore the results. These can be combined in an interactive widget showing, for example, the same figure for a given point selected interactively. It is also possible to combine multiple visualizations to generate a sequence of plots into an animation of the datacube. The package repository includes examples on how this can be done to generate a short animation. Other visualization functions are also included and documented in the package.
Storage. FlimCube and FlimFit can be easily stored and easily retrieved by using a hierarchical and compression data store format for array-like data called HDF5 (The HDF Group, 2000–2020). Using this data format, we can store multiple data in different ‘folders’, including parameters, different models, masks, raw, binned and fitted data in one file for easy retrieval, as it only loads what is asked for, saving memory consumption if necessary. In the case of multiple files, we can serve them on-demand using a web server and only load the data as necessary, including over the web, which is an HDF5 feature. The methods saveCube, saveFit, loadCube, loadFit, viewH5 are implemented in the io_utils modules inside flimview. For example, after running fitCube and saving the example data in a file, one can easily see its internal structure with:
import  flimview.io_utils as io
io.viewH5(h5file)
which produces the following output, showing the file content of the processed data:
File: test_ptu .h5
----> example_ptu: /example_ptu
--------> v0: /example_ptu /v0
------------> binned: /example_ptu /v0/ binned
----------------> data: (256, 256, 107)
----------------> mask: (256, 256)
------------> fit: /example_ptu /v0/ fit
----------------> a1: (256, 256)
----------------> a1_err: (256, 256)
----------------> chi2: (256, 256)
----------------> level: (256, 256)
----------------> level_err: (256, 256)
----------------> mask: (256, 256)
----------------> residuals: (256, 256)
----------------> tau1: (256, 256)
----------------> tau1_err: (256, 256)
----------------> tau2: (256, 256)
----------------> tau2_err: (256, 256)
------------> raw: /example_ptu /v0/ raw
----------------> data: (256, 256, 107)
--------> v1: /example_ptu /v1
------------> raw: /example_ptu /v1/ raw
----------------> data: (256, 256, 107)
--------> v2: /example_ptu /v2
------------> raw: /example_ptu /v2/ raw
----------------> data: (256, 256, 107)
--------> v3: /example_ptu /v3
------------> raw: /example_ptu /v3/ raw
----------------> data: (256, 256, 107)
More examples on how to save and retrieve FLIM data using this format are included in the example notebooks at the Github repository.
To highlight the main features of flimview, we have used two of the most common FLIM data formats, namely, the Becker and Hickl .sdt, and PicoQuant .ptu. We have included the reading routines for both data types but others can be easily extended within the module. All the figures in this paper were made using the two example files included in the package which we describe below. In particular Figure 4 shows both files presented in the same visualization after being processed into a FlimCube. Both example files are included with the package and are briefly described below.
The example file epidermis.sdt contains 2-photon excited FLIM data from the skin (epidermis) on the upper forearm of a healthy human volunteer captured with commercial optical medical imaging system (MPT-lex CARS, JenLab GmbH, Germany) (Weinigel et al., 2015). The image was captured using the procedure described in (Alex et al., 2018). For generating optical images, the excitation wavelength of the femtosecond laser was set to 760 nm and the incident in situ laser power was set to 30 mW. The light was focused through a 40x 1.35 NA objective. Autofluorescence signals within the spectral range of 405 nm–600 nm were detected. All these parameters are extracted from the file and added to the header inside the FlimCube.
The example file macrophages.ptu contains the 2-photon excited FLIM data from J774A.1 mouse macrophages grown in Dulbecco’s Modified Eagle Medium + 10% FBA + 1% antibiotic, under 5% CO2. The image was acquired with the laser set to 750 nm and the incident in situ laser power was set to 25 mW.
In this paper we have presented flimview, a novel Python 3 package to manipulate, visualize, and analyze FLIM images and measurements from specific data formats .sdt and .ptu. We included snippets on how different kernels and different masking strategies can be applied after reading the raw data into a FlimCube object. We also show how the procedure of fitting the whole cube is carried out and how these results can be visualized effectively. Most of the functions provided in this package can be customized for further research or to fit specific needs, including user defined binning kernels, mask functions or exponential decay fitting models. We showed how, using a hierarchical data format, the results from multiple files, multiple formats and multiple views can be stored in a single optimized data format called HDF5 which allows much better data management and data access to the data sets, even in the case of multiple files.
We have included two data examples along with Jupyter notebooks to explore and get started with the module and its functions. This data examples can be found in the following repository: https://github.com/Biophotonics-COMI/flimview. Individual files can be loaded locally using this snippet. Detailed instructions and description of the data included can be found in the package website:
from flimview import datasets
# Get SDT example file
datasets.fetch_sdt()
# Get PTU file
datatsets.fetch_ptu()
1. Package and installation instructions can be found here: https://github.com/Biophotonics-COMI/flimview
2. Source code can be found here: https://github.com/Biophotonics-COMI/flimview
3. Archived source code at time of publication: http://doi.org/10.5281/zenodo.3825694 (Carrasco Kind, 2020).
4. License: NCSA
| Views | Downloads | |
|---|---|---|
| F1000Research | - | - |
|
PubMed Central
Data from PMC are received and updated monthly.
|
- | - |
Provide sufficient details of any financial or non-financial competing interests to enable users to assess whether your comments might lead a reasonable person to question your impartiality. Consider the following examples, but note that this is not an exhaustive list:
Sign up for content alerts and receive a weekly or monthly email with all newly published articles
Already registered? Sign in
The email address should be the one you originally registered with F1000.
You registered with F1000 via Google, so we cannot reset your password.
To sign in, please click here.
If you still need help with your Google account password, please click here.
You registered with F1000 via Facebook, so we cannot reset your password.
To sign in, please click here.
If you still need help with your Facebook account password, please click here.
If your email address is registered with us, we will email you instructions to reset your password.
If you think you should have received this email but it has not arrived, please check your spam filters and/or contact for further assistance.
Comments on this article Comments (0)