Keywords
Teeth wear, Full ceramic crowns, CAD/CAM, surface roughness, Enamel
Teeth wear, Full ceramic crowns, CAD/CAM, surface roughness, Enamel
Wear of teeth is considered one of the most important issues when choosing a dental ceramic1,2. The wear may affect the thickness of the restoration and the natural enamel, which impairs the esthetic appearance and limits tooth survival rates3,4. Recent studies suggest that surface roughness highly influences o tooth wear5. A smooth ceramic surface enhances the function and aesthetics of teeth, and prevents gingival inflammation and the accumulation of stains and plaque on the surface of a restoration6, while a rough surface may abrade natural teeth, which compromises the appearance of the restoration7.
The repeated incidence of veneer chipping with bilayered restorations has prompted the development of monolithic restorations fabricated from high strength ceramics8,9. The present research was performed to compare the influence of polished and repolished procedures on surface roughness of the tooth and what impact on the wear rate of monolithic crowns this would have.
The materials tested in the study are listed in Table 1.
In total, 42 intact mandibular 1st molar teeth with three roots were collected from patients (age range 40–50 years) from the Dental Surgery Clinic at Faculty of Dentistry, Cairo University, as part of routine periodontal treatment. Patients provided written informed consent for their extracted teeth to be used for subsequent research purposes.
After removal, each tooth was sterilized in 0.5% sodium hypochlorite (ADWIC Egypt) and stored in saline solution. All teeth were mounted in epoxy resin (IN2 INFUSION; Easy Composites, USA) blocks using a plastic ring (25 × 35 mm). To simulate the function of the periodontium, the root was covered with thin layer of condensation silicone (Zetaplus; ZhermackSpA, Italy)10. A specially designed centralizing device was fabricated to allow accurate centralization of the tooth in the plastic ring during construction of the epoxy resin block (Figure 1).
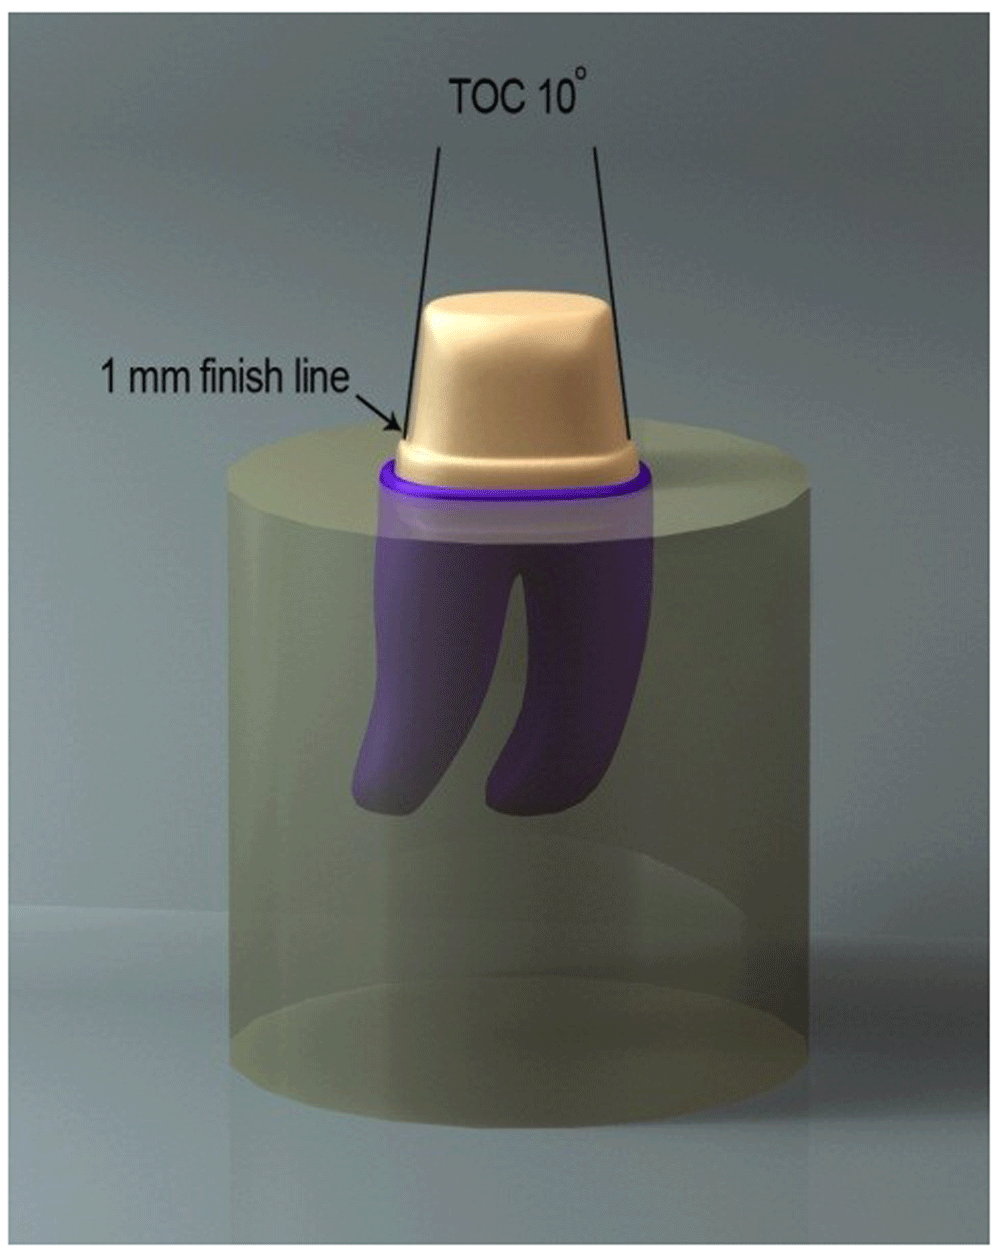
Teeth were prepared in a standardized manner using a CNC milling machine (CNC Premium 4820-i-mes, Germany). The external surface of the tooth was reduced to remove the height of contour creating a 1mm deep chamfer finish line with a 10° total convergence angles. The height of tooth was reduced 2 mm with a flat occlusal table (Figure 2 and Figure 3).

Image created by authors using Autodesk Maya Software 2016.
Fabrication of the crowns. In order to standardize the shape and dimensions of all samples, CAD/CAM technology (CEREC in-Lab SW 15.1) was used according to the instructions of the manufacturer for different types of ceramic crowns. To obtain a 3D image, the prepared tooth was sprayed using an optical reflection medium (Optispray; Sirona Dental, Bensheim, Germany) and scanned using the CEREC Omnicam (Sirona Dental). After the scanned image was displayed on the computer screen, all scanning parameters (length: 8.05 mm; width: 7.19 mm; height: 6.34mm) of each tooth were restored in computer software (CEREC in-Lab software version 15.1, Sirona Dental).
Sintering of the zirconia ceramic crowns. Firing of zirconia crowns in a sintering furnace (TABEO Furnace; MIHM-VOGT, Germany) was carried out at approximately 9 hours, reaching around 1500°C within 4 hours then decreased to room temperature within 3 hours. All zirconia crowns were checked over their corresponding teeth for seating and inspected to detect eventual defects generated by sintering.
Crystallization of E.max CAD ceramic crowns. Programat P510 furnace (Ivoclar Vivadent, Schan, Liechtenstein) was used. The starting temperature was 403°C and increased to 820°C, which was held for 10 minutes; then increased to 840°C, which was held for 7 minutes. After finishing of the firing cycle, crowns were removed and allowed to cool at room temperature. All crowns were checked over their corresponding teeth for seating and inspected to detect eventual defects generated by crystallization.
Zirconia crowns. Crowns were polished with a special polishing kit (Dedeco, Hi-glaze polishing Bur, USA) according to the manufacturer’s guidelines in a 3-step procedure at 10.000 rpm with a laboratory micromotor (Forte 100 Dental Micro Motor Unit Handpiece; Saeshin, Korea) under water cooling for 30 seconds in one direction with a constant light pressure by the same operator11–13. At the final step, Pearl surface Z was added to the polisher (fine grit size) to polish the entire crown surface14 without water to obtain a high luster gloss surface.
E-max CAD and VITA ENAMIC crowns. VITA ENAMIC crowns were prepolished by the disc of the medium grit size at 7.000 rpm hand piece under dry condition for 1 minute. Then, the polisher of extra-fine grit size was used at 5000 rpm. Wet polishing of E-max CAD crown was performed using VITA ENAMIC technical kit similar to the method used for VITA ENAMIC crowns.
Zirconia crowns. Zirconia crowns were treated with 110 μm alumina particles using an airborne-particle-abrasion device (UMG Dental Lab Sandblaster; Tangshan UMG Medical Instrument, China) for 20 second15.
E-max CAD and VITA ENAMIC crowns. The internal surfaces of crowns were treated with 5-% hydro-fluoric acid gel. Then, silane coupling agent (BISCO, Schaumburg, USA) was applied.
35% phosphoric acid (3M ESPE) was placed on the teeth for 15 seconds and then rinsed for 10 sec. A thin layer of dentin bonding agent (3M ESPE, Paul, USA) was applied and polymerized (Elipar II) for 10 sec. Rely x ultimate resin cement was applied onto the internal surface of the crown which was then placed in position with gentle finger pressure. After that, the crowns were polymerized for 40 sec and then stored in H2O for 24 hrs16.
Half of each group (zirconia, E-max CAD and VITA ENAMIC groups (n=18)) were ground at the functional cusp (mesiobuccal and distobuccal cusp) with a fine diamond bur under water spray for 15 sec in sweeping movement by a single operator.
Zirconia crowns. Crowns were repolished again by a single operator, using Kenda Zircovis polishing system with a low speed handpiece under standardized conditions (permanent water cooling, 30 second, 10,000 rpm and a constant light pressure) in sweeping motion12,17.
E-max CAD and VITA ENAMIC crowns. E-max CAD and VITA ENAMIC crowns were repolished again using Kenda Nobilis polishing system under standardized conditions (permanent water cooling, 30 second, 10,000 rpm and a constant light pressure) as suggested by the manufacturer (Figure 4).
Selection of the abrader (antagonist) specimen. In total, 42 sound and freshly extracted maxillary 1st premolar teeth were collected from patients (age range, 15–20 years) from the Dental Orthodontic Clinic at Faculty of Dentistry, Cairo University as a part of orthodontic treatment. After removal, the teeth were sterilized in 0.5% sodium hypochlorite (ADWIC Egypt) and transferred to distilled saline solution.
Preparation of human enamel antagonist specimens. Each tooth was sectioned vertically (bucco-palatally) into two halves using a diamond cutting disk (Single and Double sided diamond discs, NTI Inter flex, Kerr, Italia) attached to a low speed hand piece (Dental Latch Low Speed Contra-Angle Handpiece, NSK, Japan) with coolent. Only buccal half (cusp) of sectioned 1st premolar tooth was used as antagonists4. Jackob’s chuck holder was designed to mount the coronal portion of sectioned maxillary 1st premolar tooth (Figure 5).
Wear testing. Samples were loaded into a chewing simulator (ROBOTA chewing simulator; ROBOTA Model ACH-09075DC-T, LTD., Germany) for 100,000 cycles and subjected to 600 thermo-cycles (laboratory method of exposing ceramic crowns to temperature ranges similar to those occurring in the oral cavity) between 5⍜C and 55 ⍜C for 60 second each which simulate changes in the intraoral temperature, maintained by a thermo-statically controlled liquid circulator (Model ACH-09075DC-T, AD-TECH TECHNOLOGY CO., LTD., Germany) (Figure 6).
The samples were embedded in Teflon housing in the lower sample holder which was filled with water and kept the samples wet during the testing and removed the debris from the surface. The buccal half (cusp) of sectioned 1st premolar tooth antagonist was positioned on the ceramic crown to achieve wear contact with lateral movement of 2 mm and loaded with 49 Newton, which is equivalent to a normal chewing force in the oral cavity (Figure 7). The test was repeated 100,000 times to clinically simulate a six month chewing condition9,18.
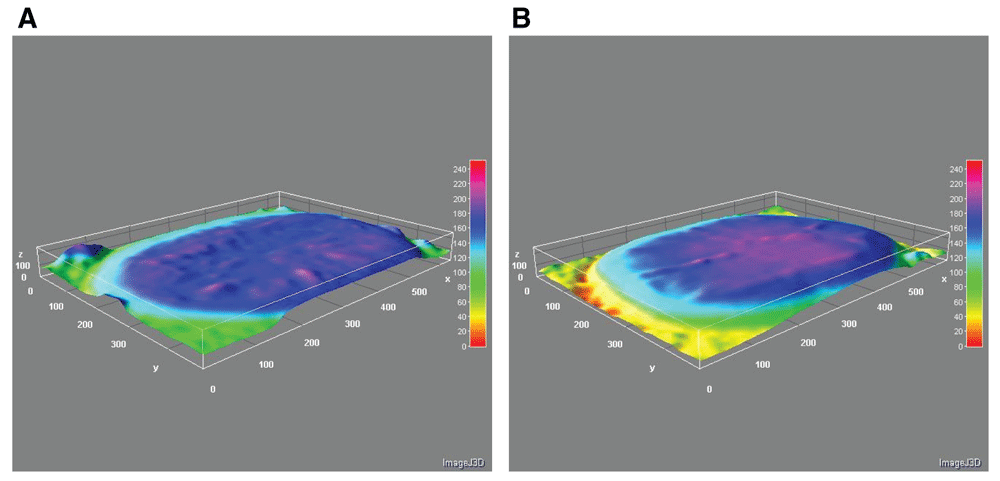
The 3D surface of the crowns were analyzed before and after the wear test using an USB digital microscope (Aven 26700-300 ZipScope USB Digital microscope, WITec, China) with a magnification of 120 X for roughness measurement19. The surface roughness expressed in micron (μm) was calculated using a digital image analysis system (WSxM software, Version 5 develop 4.1, Nanotec, Electronica, SL, Spain) by superimposing the 3D surfaces before and after the wear test (Figure 8–Figure 10). The images were recorded with a resolution of 1280 × 1024 pixels per image.

Polished with (a) Technical kit; (b) Kenda kit.
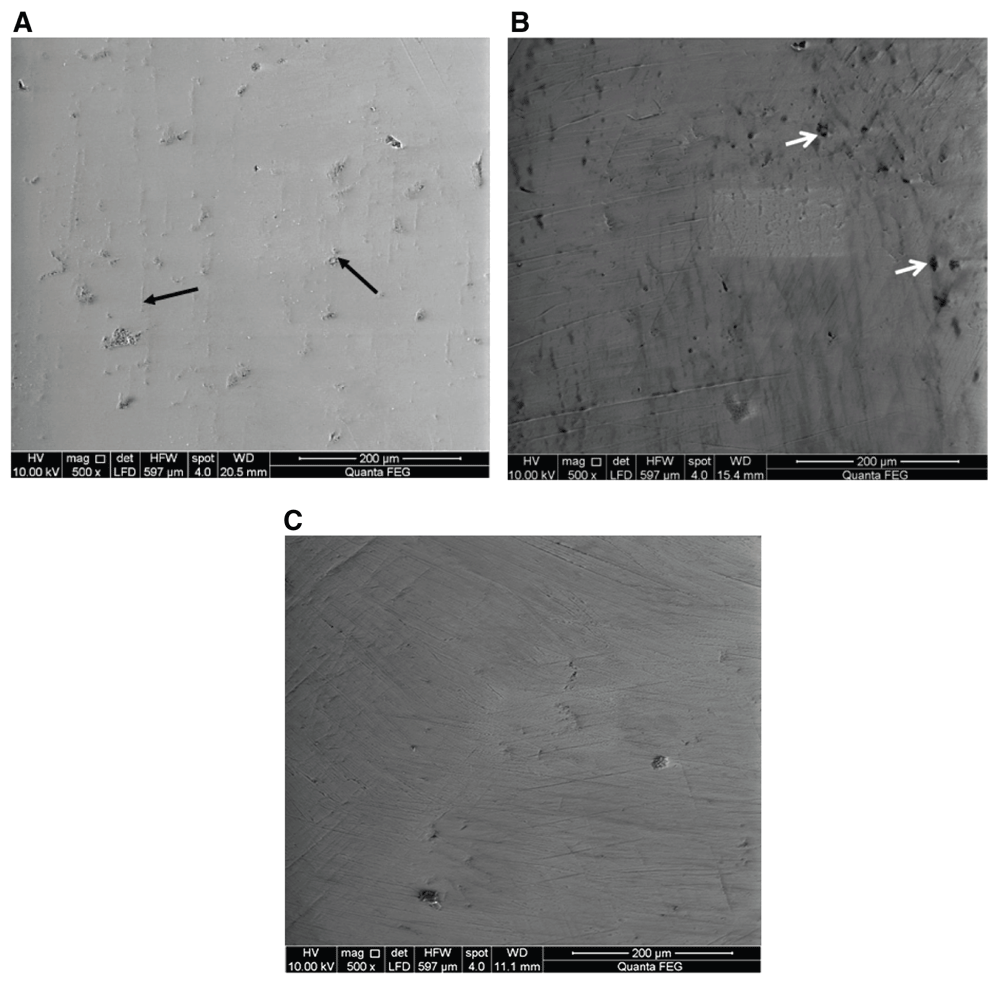
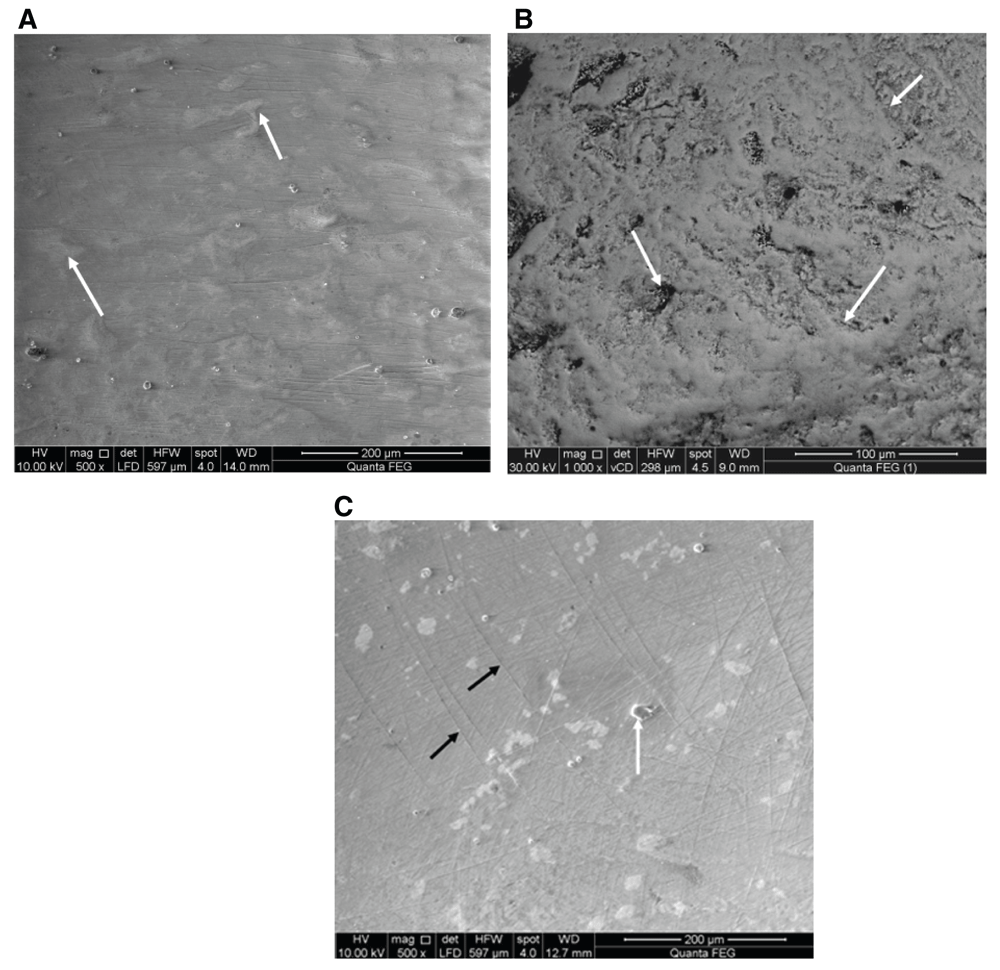
One sample of each subgroup was scanned using a scanning electron microscope (HITACHI, SU8200 series, Tokyo, Japan) at X500 magnification.
Two-factorial ANOVA was done to detect effect of two different types of polishing on the surface roughness of various ceramic crown (zirconia, E-max CAD, VITA ENAMIC). GraphPad Instat statistics software (Graph Pad InStat, Version 3, U-S-A) for Windows was used for statistical analysis. P values ≤ 0.05 are considered to be statistically significant in all tests.
Surface roughness between all groups (before chewing simulation) was not statistically significant (Table 2).
Surface roughness after chewing simulation revealed that; E.max re-polished crown had the highest surface roughness (0.2725 µm), while the lowest surface roughness value was recorded for the zirconia re-polished group (0.2570 µm). The different between surface roughness for all three crowns after chewing simulation was not statistically significant (P=0.666; Table 3).
SEM images for zirconia crowns, both polished and repolished, showed the smoothest surface compared with the other two crowns. For all polished-ground-repolished samples, surface changes, such as pitting, ridges and deep grooves, were observed on the ceramic (Figure 11–Figure 13).

(a) Polished sample, some remnants of the polishing paste, narrow voids and smooth scar (black arrows) observed; (b) ground sample, marked major void defects (white arrow) observed; (c) repolished sample, smooth shallow paralleled striation observed.

(a) Polished sample, deep grooves observed (white arrows); (b) ground sample, formation of ridges and deep grinding grooves observed (white arrows); (c) repolished sample, small voids (white arrows) and direction of polishing (black arrow) observed.
The advancement of dentistry has made it possible to construct full monolithic crowns with improved wear resistance. Intraoral adjustments of ceramic crowns may result in surface roughness; therefore, technical and intraoral polishing is a necessary procedure20. Numerous studies have compared different finishing procedures;21 however, there is little research comparing different finishing procedures and the resulting wear behavior.
In the present study, natural teeth were used as they have characteristics closer to the clinical condition22. The teeth were embedded in epoxy blocks simulating alveolar bone23, and a specially designed centralizing device was used, which was an important step for accurate centralization of the tooth in the epoxy blocks24. A constant seating force by the fingertip of a single operator was applied before curing to simulate the clinical cementation steps carried out by operators in clinical practice25,26.
The polishing procedures with dental laboratory polishing kits were chosen to simulate the surface conditions after milling. In the current study, samples were roughened with a fine diamond instrument, which ensures more uniform grind on the surface27. The same operator with a light pressure was used throughout the study to polish all samples in order to standardize the procedures11–13.
The samples were subjected to 600 thermo-cycles between 5ºC and 55ºC to simulate changes in the intraoral temperature. This thermal-cycling caused additional ageing of the samples28. The chewing force of the wear test device was 49 Newton with a frequency of ~1–1.6 Hz which simulated average chewing load in the oral cavity and equals the normal occlusal force reported in previous studies12,29.
Roughness values obtained after repolishing procedures were within the clinically acceptable value as reported by previous studies12,30. It could be assumed that the tested ceramic repolished surfaces produced only minimal wear to the opposing enamel (neglected wear). This also may indicate the efficiency of the polishing procedures carried out after grinding in smoothing the resulting roughness, which may explain the non-significant difference between the effect of the two surface finishings tested regardless of the characteristic differences of the three ceramic materials tested under chewing simulation. The results of the SEM were in agreement with previous studies11,31 as they concluded that finishing procedures might remove some of the defects on the ceramic surface.
When the effect of crown material is considered, the results revealed that the highest surface roughness value was in E.max ceramic crowns (0.267), then VITA ENAMIC ceramic crowns (0.266), while the lowest roughness was recorded for zirconia crown (0.257), but these differences were not significant. Rashid32 previously said that despite the variation in base line crystalline structures between these ceramics, smooth surface can be produced for different ceramics with the same polishing steps. Therefore, the present results were not a surprising result, as the same kits were used in the current study.
All tested crowns showed surface roughness within acceptable clinical parameters when subjected to a different surface finish and six-month chewing simulation.
No change in the wear behavior was encountered with the three tested ceramic materials with the applied surface finishing procedures.
Intraoral polishing procedures could be considered a reliable technique for smoothing of the zircona, E.max and VITA ENAMIC crowns after occlusal adjustment.
Open Science Framework: Wear Assessment of Current Esthetic Crowns Against Human Enamel After Two Finishing Procedures: In vitro study, https://doi.org/10.17605/OSF.IO/MYGWD33.
This project contains the following underlying data:
Zip file containing images of digital microscope for each crown, before and after six month chewing simulation.
Results.xls: raw surface roughness values for each crown and treatment, before and after six month chewing simulation.
SEM raw, unedited images for those shown in Figure 11–Figure 13.
3D topography files for the images shown Figure 8–Figure 10.
CEREC software images.
Data are available under the terms of the Creative Commons Zero "No rights reserved" data waiver (CC0 1.0 Public domain dedication).
| Views | Downloads | |
|---|---|---|
| F1000Research | - | - |
|
PubMed Central
Data from PMC are received and updated monthly.
|
- | - |
Is the work clearly and accurately presented and does it cite the current literature?
Partly
Is the study design appropriate and is the work technically sound?
Yes
Are sufficient details of methods and analysis provided to allow replication by others?
Yes
If applicable, is the statistical analysis and its interpretation appropriate?
Yes
Are all the source data underlying the results available to ensure full reproducibility?
Yes
Are the conclusions drawn adequately supported by the results?
Yes
Competing Interests: No competing interests were disclosed.
Reviewer Expertise: Fixed Prosthodontics, Material Sciences
Peer review at F1000Research is author-driven. Currently no reviewers are being invited.
Alongside their report, reviewers assign a status to the article:
| Invited Reviewers | |
|---|---|
| 1 | |
|
Version 1 17 Jul 19 |
read |
Provide sufficient details of any financial or non-financial competing interests to enable users to assess whether your comments might lead a reasonable person to question your impartiality. Consider the following examples, but note that this is not an exhaustive list:
Sign up for content alerts and receive a weekly or monthly email with all newly published articles
Already registered? Sign in
The email address should be the one you originally registered with F1000.
You registered with F1000 via Google, so we cannot reset your password.
To sign in, please click here.
If you still need help with your Google account password, please click here.
You registered with F1000 via Facebook, so we cannot reset your password.
To sign in, please click here.
If you still need help with your Facebook account password, please click here.
If your email address is registered with us, we will email you instructions to reset your password.
If you think you should have received this email but it has not arrived, please check your spam filters and/or contact for further assistance.
Comments on this article Comments (0)